Sunday, July 21, 2013

Salmon Sliders With Wasabi Mayo & Pickled Cucumber

Take a break from the grill and enjoy these quick and delicious sliders!


I recently got married and moved to an apartment in Summit, NJ. While this is my first summer as a married man, it is also my first summer without a grill. Not having a grill has been tough, especially when it's 90 degrees and I'm craving a burger!


Cook each side of the sliders for two
minutes. Then, turn the heat down to
medium, cover the pan and cook for
another five minutes.
As a remedy for my burger cravings, I recently turned to my mother's recipe for salmon sliders with wasabi mayo and pickled cucumber. We've made these sliders at our bakery before and they're always a big hit.

After making these sliders two nights in a row this past week, I have quickly forgotten about not having a grill. While the salmon patties and the pickled cucumber are both delicious, the wasabi mayo is the highlight of this dish. The wasabi adds a light kick to the mayonnaise and the lemon and cilantro gives it a freshness that complements the salmon. The wasabi mayo also makes for a great vegetable dip if you have any left over from the sliders.

This recipe is easy enough to make on a week night, but is also perfect for impressing guests at a weekend dinner party. Though any quality of salmon can be used in this recipe, we recommend Atlantic farm-raised salmon that can be found at most grocery stores. Atlantic farm-raised salmon has great flavor for making sliders and will be more affordable than Sockeye or King Salmon.
 -Calvin Virgilio


Salmon Sliders With Wasabi Mayo & Pickled Cucumber

Recipe Makes 7 sliders

Ingredients:
  • 1 large seedless cucumber (about one pound)
  • 1 Tbsp. cider vinegar
  • 1 1/2 tsp. sugar
  • 1/4 tsp. dried hot pepper flakes
  • 1 large egg white
  • 1 1/2 Tbsp. soy sauce
  • 2-3 Tbsp. minced fresh ginger root.
  • 1 lb. piece of salmon fillet, skin discarded and fish cut into quarter-inch pieces
  • 3/4 cup fine fresh bread crumbs
  • 4 scallions, chopped
  • 1 1/2 tsp. mustard seeds
  • 1 Tbsp. vegetable oil
  • Mixed organic greens
  • Slider Buns
  • 1 cup mayonnaise
  • Juice of 1-2 lemons
  • Wasabi paste to taste (Find at Asian grocery stores or your local Wegmans or Whole Foods)
  • 1/3 cup chopped fresh cilantro or parsley

Procedure:

Making the Pickled Cucumber

Slice cucumber lengthwise into to pieces. Then cut into thin slices.  Toss cucumber in a bowl with vinegar, sugar, red pepper flakes and salt to taste. Set aside while you make the wasabi mayo and salmon patties.

Making the Wasabi Mayo

In a small mixing bowl, combine the mayonnaise with lemon juice and chopped cilantro or parsley and mix well. Mix in the wasabi paste to taste. I used about 2 1/2 tablespoons when I made this recipe.

Making the Salmon Patties

In another bowl, whisk together egg white, soy sauce and ginger until combined well. Stir in chopped salmon, bread crumbs, scallions, mustard seeds and salt to taste. In a food processor, puree 1 cup  of salmon mixture and return to salmon mixture remaining in bowl. Stir salmon mixture once more and then begin forming into small slider patties, about 3 inches in diameter. Refrigerate for at least 20 minutes. Meanwhile, drain cucumbers and set aside.

In a large non-stick skillet heat oil over moderately high heat until hot but not smoking and cook patties until golden, about 2 minutes on each side. Cook patties, covered, over moderate heat until just cooked through, about 5 more minutes.

Assembling Sliders

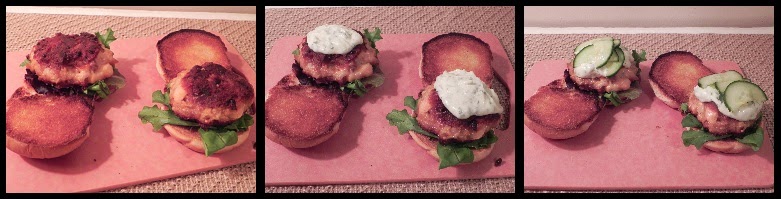
As salmon patties are cooking, lightly brush slider buns with melted butter, and toast in oven. Once buns are toasted, arrange mixed greens on the buns and top with the salmon, wasabi mayo and cucumber.

The salmon sliders are now ready for serving!

Saturday, July 13, 2013

Perfecting The Summer Fruit Tart

This seasonal dessert allows you to showcase your favorite summer fruits!


We've all bit into a fresh fruit tart that looks beautiful but tastes bland. A good fruit tart will not only look great on a dessert table, but it will taste even better.

Our recipe calls for a few tweaks to the typical fruit tart ingredients, and it also brings a few new ingredients into play that add more flavor and texture to the dish. 
Form the Pate Sucree into the pan, making
 a thick dough rim around the edges

Start With The Pate Sucree

Never underestimate the importance of a good pastry crust! Many prepared fruit tarts, including those found in the grocery store, will use a puffed pastry crust. Our recipe calls for a traditional Pate Sucree (pahtsoo-Cray), which is a traditional French sweet pastry dough. A pate sucree is easy to make and will provide more of a shortbread cookie foundation to your tart, rather than a lighter, less flavorful crust that comes from a puffed pastry.


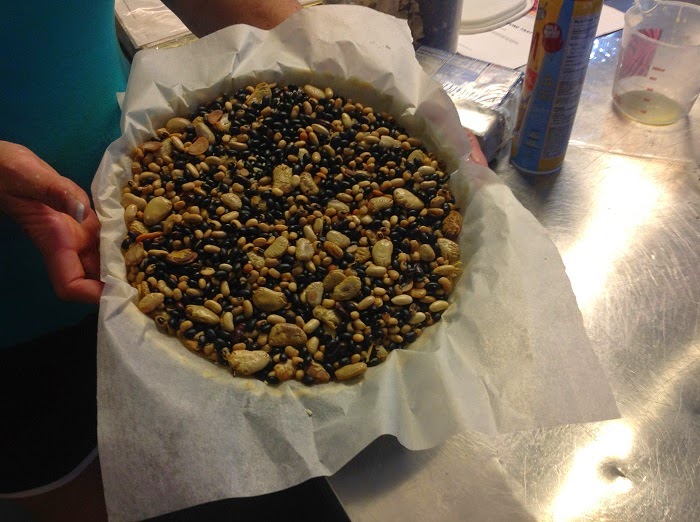
Once you've processed and rolled the dough, form it into the tart pan and be sure to get a thick rim of dough around the edges of the pan. You'll then want to par bake the crust by placing parchment or aluminum foil over top of the dough, and then placing a layer of dried beans on top of parchment.

Add parchment paper on top of the dough, then
add hard beans before baking, so that the dough keeps
its shape in the oven.


The Pastry Cream

There are many ways to make a pastry cream for your fruit tart, but our recipe calls for heavy cream and a good quality cream cheese. Using heavy cream will give thicker and richer cream that complements the flavor of the fruit.


Chocolate Makes Everything Taste Better!

There's no denying it. Chocolate is a vital ingredient to great desserts. A little bit can go a long way, so add a half cup of semi-sweet chocolate chips to the tart shell as soon as it comes out of the oven. Let the chocolate melt and spread into a thin layer over the crust. This will act as a barrier between the pastry cream and the crust, while adding a hint of chocolate to every bite. Also, try drizzling melted white chocolate on top of the fruit for both presentation and flavor!


Fresh Fruit Tart with Pate Sucree, Chocolate & Pastry Cream Filling
Serves: 6-8

Ingredients

Pate Sucree (Shortbread Crust)
  • 1 1/2 cups all-purpose flour
  • 3 Tbsp. sugar
  • Pinch of salt
  • 1/2 cup (1 stick) cold butter, cut into pieces
  • 1 egg yolk combined with 1 Tbsp. cold water.
  • 1 Tbsp. Vanilla Extract
  • 1/2 cup toasted almonds or pecans (optional)
  • 1/2 cup semi-sweet chocolate chips
Pastry Filling and Fruit.
  • 2 - 8 oz. packages of Philadelphia Cream Cheese
  • 1-pint heavy whipping cream, very cold.
  • 1 Tbsp. vanilla extract
  • Confectioner's sugar to taste
  • Sliced seasonal fresh fruit as a garnish
  • Strained currant or apricot jam to glaze fruit.
  • 1/4 cup white chocolate chips plus 1-2 Tbsp. corn oil

Procedure

Make the Pate Sucree
  1. Preheat oven to 375 degrees.
  2. Combine flour, salt and sugar in a food processor until well blended, if adding nuts do so now and process until finely chopped.
  3. Add the pieces of cold butter and mix in food processor until mixture resembles coarse meal.
  4. Add egg yolk combined with cold water and vanilla to the mixture and process until the dough forms a ball inside the food processor bowl.
  5. Remove dough and sandwich between parchment papers. Roll the dough into 10-inch circle and refrigerate until chilled.
  6. Remove parchment and place dough in removable bottom tart pan. Be sure to push the dough up on the sides of the pan to form a thick crust barrier.
  7. Using a fork, pierce dough with tines to prevent dough from bubbling up (called “docking”).
  8. Spray parchment paper lightly with vegetable spray and place sprayed side against dough (this will prevent dough from sticking to parchment once parchment is removed).
  9. Fill parchment lined pastry with pie weights or dried beans to weigh down dough for baking. (This technique is called “blind baking,” it’s purpose is to prevent the buttery dough from loosing its shape while baking in a very hot oven)
  10. Place lined tart shell in the oven for 10 minutes. After 10 minutes, carefully remove bean-lined parchment from tart; place the tart shell back in the oven until the crust is lightly golden, about 5-8 more minutes.
  11. As soon as the tart shell is removed, sprinkle 1/2 cup of chocolate chips on the crust and allow time for them to melt. Then, use a pastry brush to spread melted chocolate and coat the shell. Allow the shell to cool to room temperature and then refrigerate to firm up chocolate until ready to fill with cream filling. (Coating pastry with chocolate not only adds one of my favorite flavors to this dessert but it also creates a barrier between the flaky crust and the rich pastry keeping this tart delicious for several days – if it lasts that long!)

Make the Cream Filling
  1. In a large bowl, use a hand mixer to beat cream cheese until soft and creamy. Add the vanilla and confectioner's sugar to taste. Be sure not to make it too sweet, as you'll be adding other sweet ingredients such as the fruit!
  2. In a separate large bowl, beat the heavy cream until stiff peaks form and it thoroughly whipped.
  3. Fold the whipped cream into the cream cheese mixture and adjust sweetness with the confection's sugar.
Assembling Tart
  1. Fill the tart shell with the cream cheese mixture, using an offset spatula to spread evenly.
  2. Garnish with the sliced seasonal fruit.
  3. Heat & brush the strained currant or apricot jam to glaze the fruit.
  4. Finally, melt a 1/4 cup of white chocolate chips. You may add 1 to 2 teaspoons of corn oil to the melted chocolate if it is too thick. Use a fork to drizzle white chocolate over top of the fruit.
You've now added the final touches to the fruit tart and are ready to serve. Bon Appetito!


Thursday, January 17, 2013

Tempura Soft Shell Crab With Citrus Gastrique


Everyone has his or her own opinion on when summer starts. For me, it’s when I see soft-shell crabs in the seafood display at the grocery store. Soft-shell crabs are just regular crabs (blue crabs in the U.S.) that have outgrown their shells. They are full of fresh crab flavor without the hassle of dealing with the hard crab shell. Though there are many delicious ways to cook soft shells, my favorite recipe involves breading and frying the crabs, and topping them with a sweet citrus gastrique! The combination of tender crab meat coupled with Asian flavorings is sure to get you in the summer state of mind. 

From the recipes of Suzanne Virgilio

Tempura Soft-shell Crab w/Oriental Salad & Citrus Gastrique

Serves 2 - 4

Ingredients

  • 4 large cleaned soft shells – (Ask your fishmonger to prepare them cleaned for you)
  • 2/3-cup flour
  • 1/2-cup cornstarch
  • 1/2 tsp salt
  • 1/2 tsp garlic powder
  • 1/2 tsp onion powder
  • 1/4 tsp cayenne
  • 1 beaten egg
  • 1-cup cold seltzer wate 
  • Oil for frying
Procedure
Season soft shells with salt & pepper
Combine the next six ingredients in another medium bowl – stir well
Add seltzer water & beaten egg to flour/cornstarch mixture and whisk until smooth
 
Dressing

Ingredients
  • 3/4-cup soy sauce
  • 1/2-cup sesame oil
  • 1/4 cup Asian Chili garlic sauce or to taste
Combine all ingredients and stir well

Oriental Salad

Ingredients
  • 1 lb angel hair pasta, cooked a la dente and tossed w/ olive oil
  • 1 julienned red pepper
  • 1 julienned yellow or orange pepper
  • 1-cup julienned Napa cabbage
  • 2 cups steamed broccoli florets
  • 1 bunch sliced scallions
  • 1/2 bunch cilantro – chopped  - additional for garnish
  • 1/2 cup salted peanuts (optional) – additional for garnish
Toss vegetables with pasta and top with dressing – toss until well combined

 Gastrique

Definition of a Gastrique: In plain terms, a gastrique is a sweet-and-sour sauce at its simplest. You caramelize sugar (or sometimes honey), combine it with equal parts vinegar, and reduce it slightly to make a tart, slightly thickened syrup. (Definition from Seriouseats.com)

Ingredients
  • 1-cup sugar
  • 1/2-cup rice wine vinegar
  • 1/4 cup orange juice
  • 1/4 cup lemon juice
Combine all ingredients in a medium saucepan and heat over medium flame, stir occasionally and bring to a simmer.  Continue to heat until all sugar is dissolved and mixture is clear. 

Remove from heat and pour into a heatproof pitcher.

Assembling

Heat oil until almost smoking.

While oil is heating dip softshell into tempura batter, shaking off any excess.

First, carefully holding the top of the softshell, drag the legs thorough the oil first, for 1 minute.  This will allow the individual legs to fry separately instead of together.  Then lay the softshell top side down, into the oil.  Fry 2-3 minutes or until golden.  Flip the softshell over and continue frying for an additional 2-3 minutes.

Remove from the fryer and allow draining on paper towel
 
To serve -  mound the salad into the center of a platter. 

Arrange the softshell around the salad.

Drizzle the gastrique over the entire platter

Garnish with additional chopped peanuts and chopped cilantro.

Pumpkin Pancakes with Apple Cider Syrup


The priorities for Christmas in our house go something like this: 1. God 2. Food 3. Family. Okay, so perhaps I’m being a bit dramatic putting food before family, but what we eat between Christmas Eve and Christmas evening certainly has its importance. On Christmas Eve, we celebrate the Italian feast of the seven fishes. On Christmas day, we’ve cooked everything from prime rib and Yorkshire pudding to roasting a whole goose. And while both of these meals are two of my yearly favorites, it is the Christmas breakfast that I’ve come to enjoy the most.
Once my family has finished opening gifts on Christmas morning, my two brothers will start playing with their latest video game, my mom will be relaxing on the couch and my dad will head to the kitchen to get another round of coffee brewing. Since my mom is always in charge of cooking Christmas dinner, I try help her out by taking the role of the breakfast chef.  This year, I’m planning to serve family favorite: pumpkin pancakes with apple cider syrup. This is a recipe that my mom has used for years at the bed and breakfast. The flavor of pumpkin paired with sweet apple cider is sure to be the perfect ending to Christmas morning.
Pumpkin Pancakes with Hot Apple Cider Syrup
Ingredients:
Cider Syrup
·         1 ½ cups apple cider
·         1 cup brown sugar
·         1 cup corn syrup
·         4 tablespoons butter
·         2 tablespoons fresh lemon juice
·         1/8 teaspoon cinnamon
·         1/8 teaspoon nutmeg
·         Grated zest of 1 lemon
·         2 granny-smith apples, cored and cut into small dice

Pancakes
·         2 cups flour
·         2 tablespoons sugar
·         4 teaspoons baking powder
·         ¾ teaspoon salt
·        ½ teaspoon ground coriander
·         ½ teaspoon nutmeg
·         1 tablespoon cinnamon
·         1 ½ cups buttermilk
·         1 cup canned unsweetened pumpkin puree
·         4 egg yolks
·         ½ cup salted butter, melted
·         1 tablespoon vanilla extract
·         4 egg whites

Cooking the Cider Syrup
In a saucepan, bring to a boil all of the ingredients except for the diced apples. Once the mixture has come to a boil, reduce the heat and simmer uncovered for 15 minutes, or until the mixture is the consistency of maple syrup. Just before serving, add the diced apples and heat for several minutes until the apples are soft.
Making the Pancakes
Sift the dry ingredients, combine them in a bowl and mix well. In a separate bowl, combine and mix the buttermilk, pumpkin puree, egg yolks, butter and vanilla. Once mixed, add to them to the dry ingredients and stir just until blended. Meanwhile, beat the egg whites with an electric beater until they are stiff, but not dry (see photo below for an example of how the egg whites should look). Once the egg whites are stiff, fold them into the pancake batter.
Once the batter is ready, melt 1 tablespoon of butter on a griddle over medium-low heat. Scoop pancake batter onto the griddle using a 1/3 measuring cup. Cook pancakes on one side for 4-5 minutes, then check to see if they are ready to flip. Once you flip the pancakes, they should only take a few more minutes until they’re ready to serve.
Serve pancakes with a slice of butter and top them with the apple cider syrup. Enjoy!

Duck Panang Curry With Julienne Vegetables


Valentine's day is here, and many of  you will be heading out for a romantic dinner. But considering that Valentine's Day falls on a Tuesday, you may be considering staying home to make a special meal. If that's the case, we recommend treating your date to this delicoius duck panang curry dish.
Thai food is the perfect balance of sweet and spicy. While some Thai curries can be VERY spicy, Panang is milder and pairs perfectly with the flavor of duck.
The toughest part about making Thai food is the preparation. Before you start searing the duck or cooking the sauce, we recommend chopping all the vegetables and herbs ahead of time. Once you've prepped everything, the recipe is actually quite easy to follow!
4 to 6 Servings
Ingredients
  • 3-4 duck breast halves
  • 2 red bell peppers, julienned
  • 10-15 brocoli florets
  • 1/4 lb frenched green beens
  • 5 carrots, julienned
  • 1 tablespoon hot chili garlic paste (sambal oelek)*
  • 1/4 cup cilantro, chopped
  • 2 finely chopped shallots
  • 4-5 cloves garlic, minced
  • 1.5" piece of fresh ginger, minced
  • 1/4 Cup Thai Panang curry paste**
  • 27 ounces unsweetened coconut milk**
  • 1 tablespoon light brown sugar
  • 2 teaspoons fish sauce*
  • 2 Cups cooked jasmine or basmati rice
  • Salt and Pepper to taste

*These ingredients are available in the Asian section of many supermarkets and at Asian food markets.

 
**Be sure to buy good quality curry paste and coconut milk. For all Thai dishes we make at the bakery, we use Maesri brand curry paste and Chaokoh coconut milk.
Cooking the Duck Breasts
Duck is a very fatty meat, and the fat adds to its flavor. To prep the duck, you'll want to score the skin side and season it with salt. For an example of how to score a duck breast, see this video:
 

Place the duck breasts skin side down in a cold skillet over low-medium heat. Starting off with a cold skillet allows the skin to crisp without burning the skin. After eight minutes of cooking on the skin side, flip the duck and cook for another three to four minutes for a nice rosy-pink center. Once the duck has cooked, put it aside to cool, and then slice the breasts so they are ready when the time comes to add them to the curry sauce.
***There will be leftover duck fat in the pan. Pour this fat into a bowl for use in the vegetables and curry sauce.
Saute the Vegetables
Add two tablespoons of the duck fat to the skillet and saute half of the shallots, garlic and ginger until fragrant. Then, add the brocoli, green beans, and julienned carrots. Saute these vegetables for two to three minutes, and then add the bell peppers and hot chili paste. Saute for another two to three minutes to allow flavors to combine. Once vegetables are sauteed, take them out of the skillet and set them aside.
Making the Panang Curry Sauce
Add two tablespoons of duck fat to skillet and saute the remaining shallots, garlic and ginger. Once these three ingredients are fragrant, add the curry paste, brown sugar and fish sauce to the skillet. Mix these ingredients together with a wooden spoon over low-medium heat for two to three minutes. Once the flavors have combined, stir in the unsweetend cocunut milk. Bring to a boil and then simmer the sauce. You can add 1/2 cup of water if the sauce seems thick.
Season the sauce with salt and pepper to taste. Finally add the sliced duck breast to the sauce and stire until coated.
Prepare for serving
Scoop a cup of rice onto the plate. Then add the sauce and a few slices of the duck breast on top. Top the curry sauce with the sauteed vegetables and some freshly chopped cilantro. Enjoy!

Wednesday, January 16, 2013

Fire-Pit Paella


Fire-Pit Paella
Serves 8-10

When it comes to outdoor summer cooking, burgers, ribs and bbq come to mind. But our personal favorite meal to cook outdoors is paella. Though paella can be cooked any time of year on a stove, the smokiness that comes from cooking over a wood-burning fire will enhance the flavor of the overall dish.  So light the fire pit, grab the paella pan, and invite your friends for a great outdoor meal that everyone will remember.
Paella is a dish that originated in Valencia, Spain. Named after the giant pan that it is cooked in, Paella recipes come with many forms and ingredient combinations, but our paella calls for a few essential ingredients.
Medium grain rice, such as bomba or callaspara rice, have the right texture for paella and soak up all of the flavors of the dish. Saffron threads give the paella a yellow color and distinct flavor that can’t come from any substitute. Spanish chorizo will give the paella a spicy and smoky taste. Hot seafood stock, preferably homemade, is the best liquid base to cook the rice. A licorice-flavored liqueur, such as Pernod, will enhance the seafood flavor of the paella.
The Fire
We recommend building the fire pit with a mix of hard wood and wood-charcoal briquettes. This will give a nice smokiness and consistent heat for the large paella pan. Build the fire and allow it to burn down to hot coals. While the fire burns, prep your ingredients.
Ingredients:
  • 2.5 cups Rice (bomba or callaspara rice preferred)
  • 2 lobsters, halved (ask your fishmonger to do this)
  • 1-2 lbs. medium wild shrimp, peeled and deveined
  • 1 lb. fresh calamari, cleaned and cut into rings
  • 1-2 lbs. chicken breast, cut into one inch pieces
  • 1 lb. Spanish Chorizo, cut into ½ inch thick rounds
  • 7 cups hot seafood stock (homemade stock preferred)
  • ½ cup licorice-flavored liqueur (Pernod is preferred)
  • 3 bell peppers cut into strips
  • 2 cups thawed petite peas
  • 2 cups chopped leaks
  • 2 Tbs. minced garlic
  • 1 Tbs. Smoked Parika
  • 2 tsp. Saffron threads
  • 2 lemons cut into wedges
  • ½ cup extra virgin olive oil
  • ½ cup freshc chopped parsley
  • Kosher salt to taste

Making the Paella

After paella pan has become hot over the fire, drizzle the olive oil and begin sautéing your sofrito. The sofrito is the base of aromatic ingredients that is sautéed in olive oil. For our paella, the sofrito is composed of chopped leeks, garlic, and chorizo. Add these ingredients to the olive oil, one by one, layering the flavors.
Once your sofrito is sautéed and fragrant, add the chicken and chorizo to the pan and sauté for three to four minutes. Next add your smoked paprika and toss ingredients once more. Then, add your rice and toss until ingredients are combined.
Once the rice has been combined, add hot seafood stock, one cup at a time, and stir as you go. After the stock is added, mix the saffron threads into your paella.
Now that the stock and saffron is mixed in, restrain the urge to stir your paella until the liquid has boiled down and the rice has cooked. Not stirring your paella will allow a toasted, flavorful crust known as the soccarat to form on the bottom of the pan.
After the liquid has boiled down, add your Pernod and stir the Paella to incorporate the liqueur. Next, add your bell peppers, shrimp, lobster and petite peas. We recommend covering the pan with tin foil and allowing the heat to cook your final seafood ingredients.
Once the shrimp is cooked and the lobster has turned red, sprinkle the paella with fresh parsley. Serve paella with lemon wedges, and be sure to scrape some of the soccarat on the bottom of the pan onto each plate. Enjoy!

Tuesday, February 21, 2012

Cherry Almond & Quinoa Breakfast Cookie

A cookie that's made with our Cherry Almond & Quinoa granola is perfect for breakfast! It's packed with protein, fiber and antioxidants. Try baking them on the weekend so that you have them ready for the busy work week commute!


Makes about 20 Cookies
Ingredients:
  • 1.5 Cups King Arthur Flour
  • ½ Tsp. Kosher Salt (if preferred)
  • ½ Tsp. Baking Powder
  • ½ Tsp. Baking Soda
  • ½ Cup Butter
  • ¼ Cup Granulated Sugar
  • ¼ Cup Light Brown Sugar
  • 2 Lg. Eggs
  • 1 Tsp. Pure Vanilla Extract
  • 2 Cups Granola Factory Cherry Almond Granola
Preparation
Preheat oven to 350°. Line 2 baking sheets with parchment paper. Whisk flour, salt, baking powder, and baking soda in a medium bowl. Using an electric mixer, beat butter and both sugars in a large bowl until light and fluffy, about 3 minutes. Add eggs and extract; beat until pale and fluffy, about 2 minutes. Beat in flour mixture, 1/2 cup at a time. Stir in 2 cups granola. Spoon dough in 2-tablespoon portions onto prepared sheets, spacing 1” apart. Bake until golden, about 12-15 minutes.